Bathroom Reveal

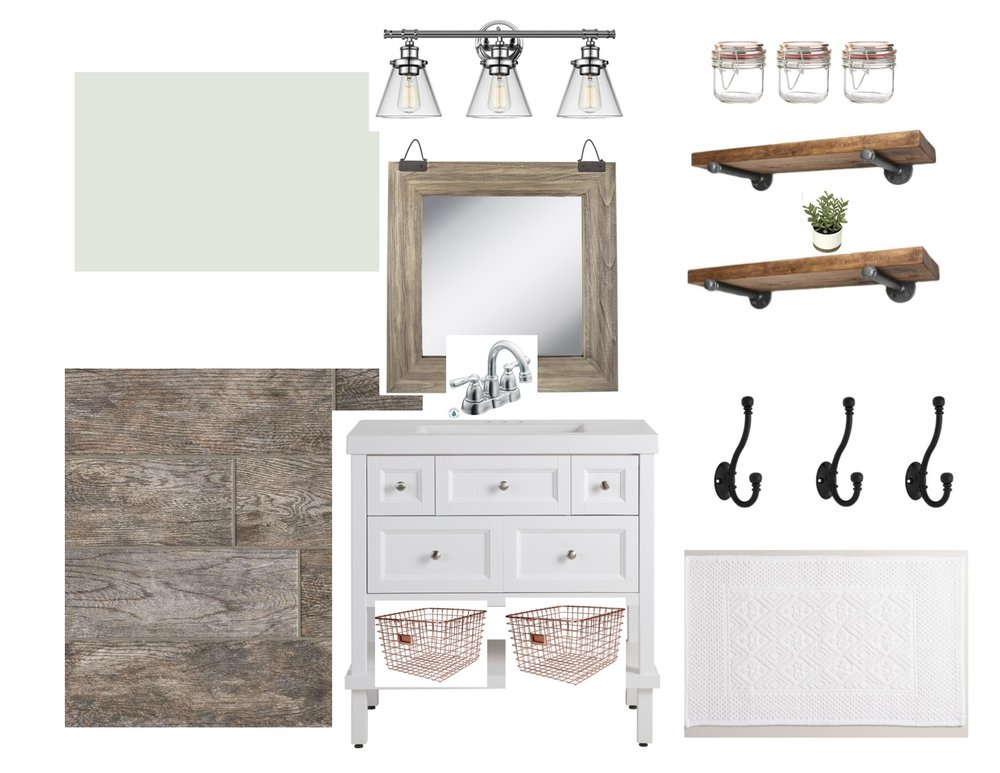
It's time to finally reveal our full bath remodel! I'm so excited to share the final product with you all. We worked so hard on it, when I say we I mean my husband, and I love the way it turned out! Here is the storyboard I created for the full bath. 

Bathroom Storyboard

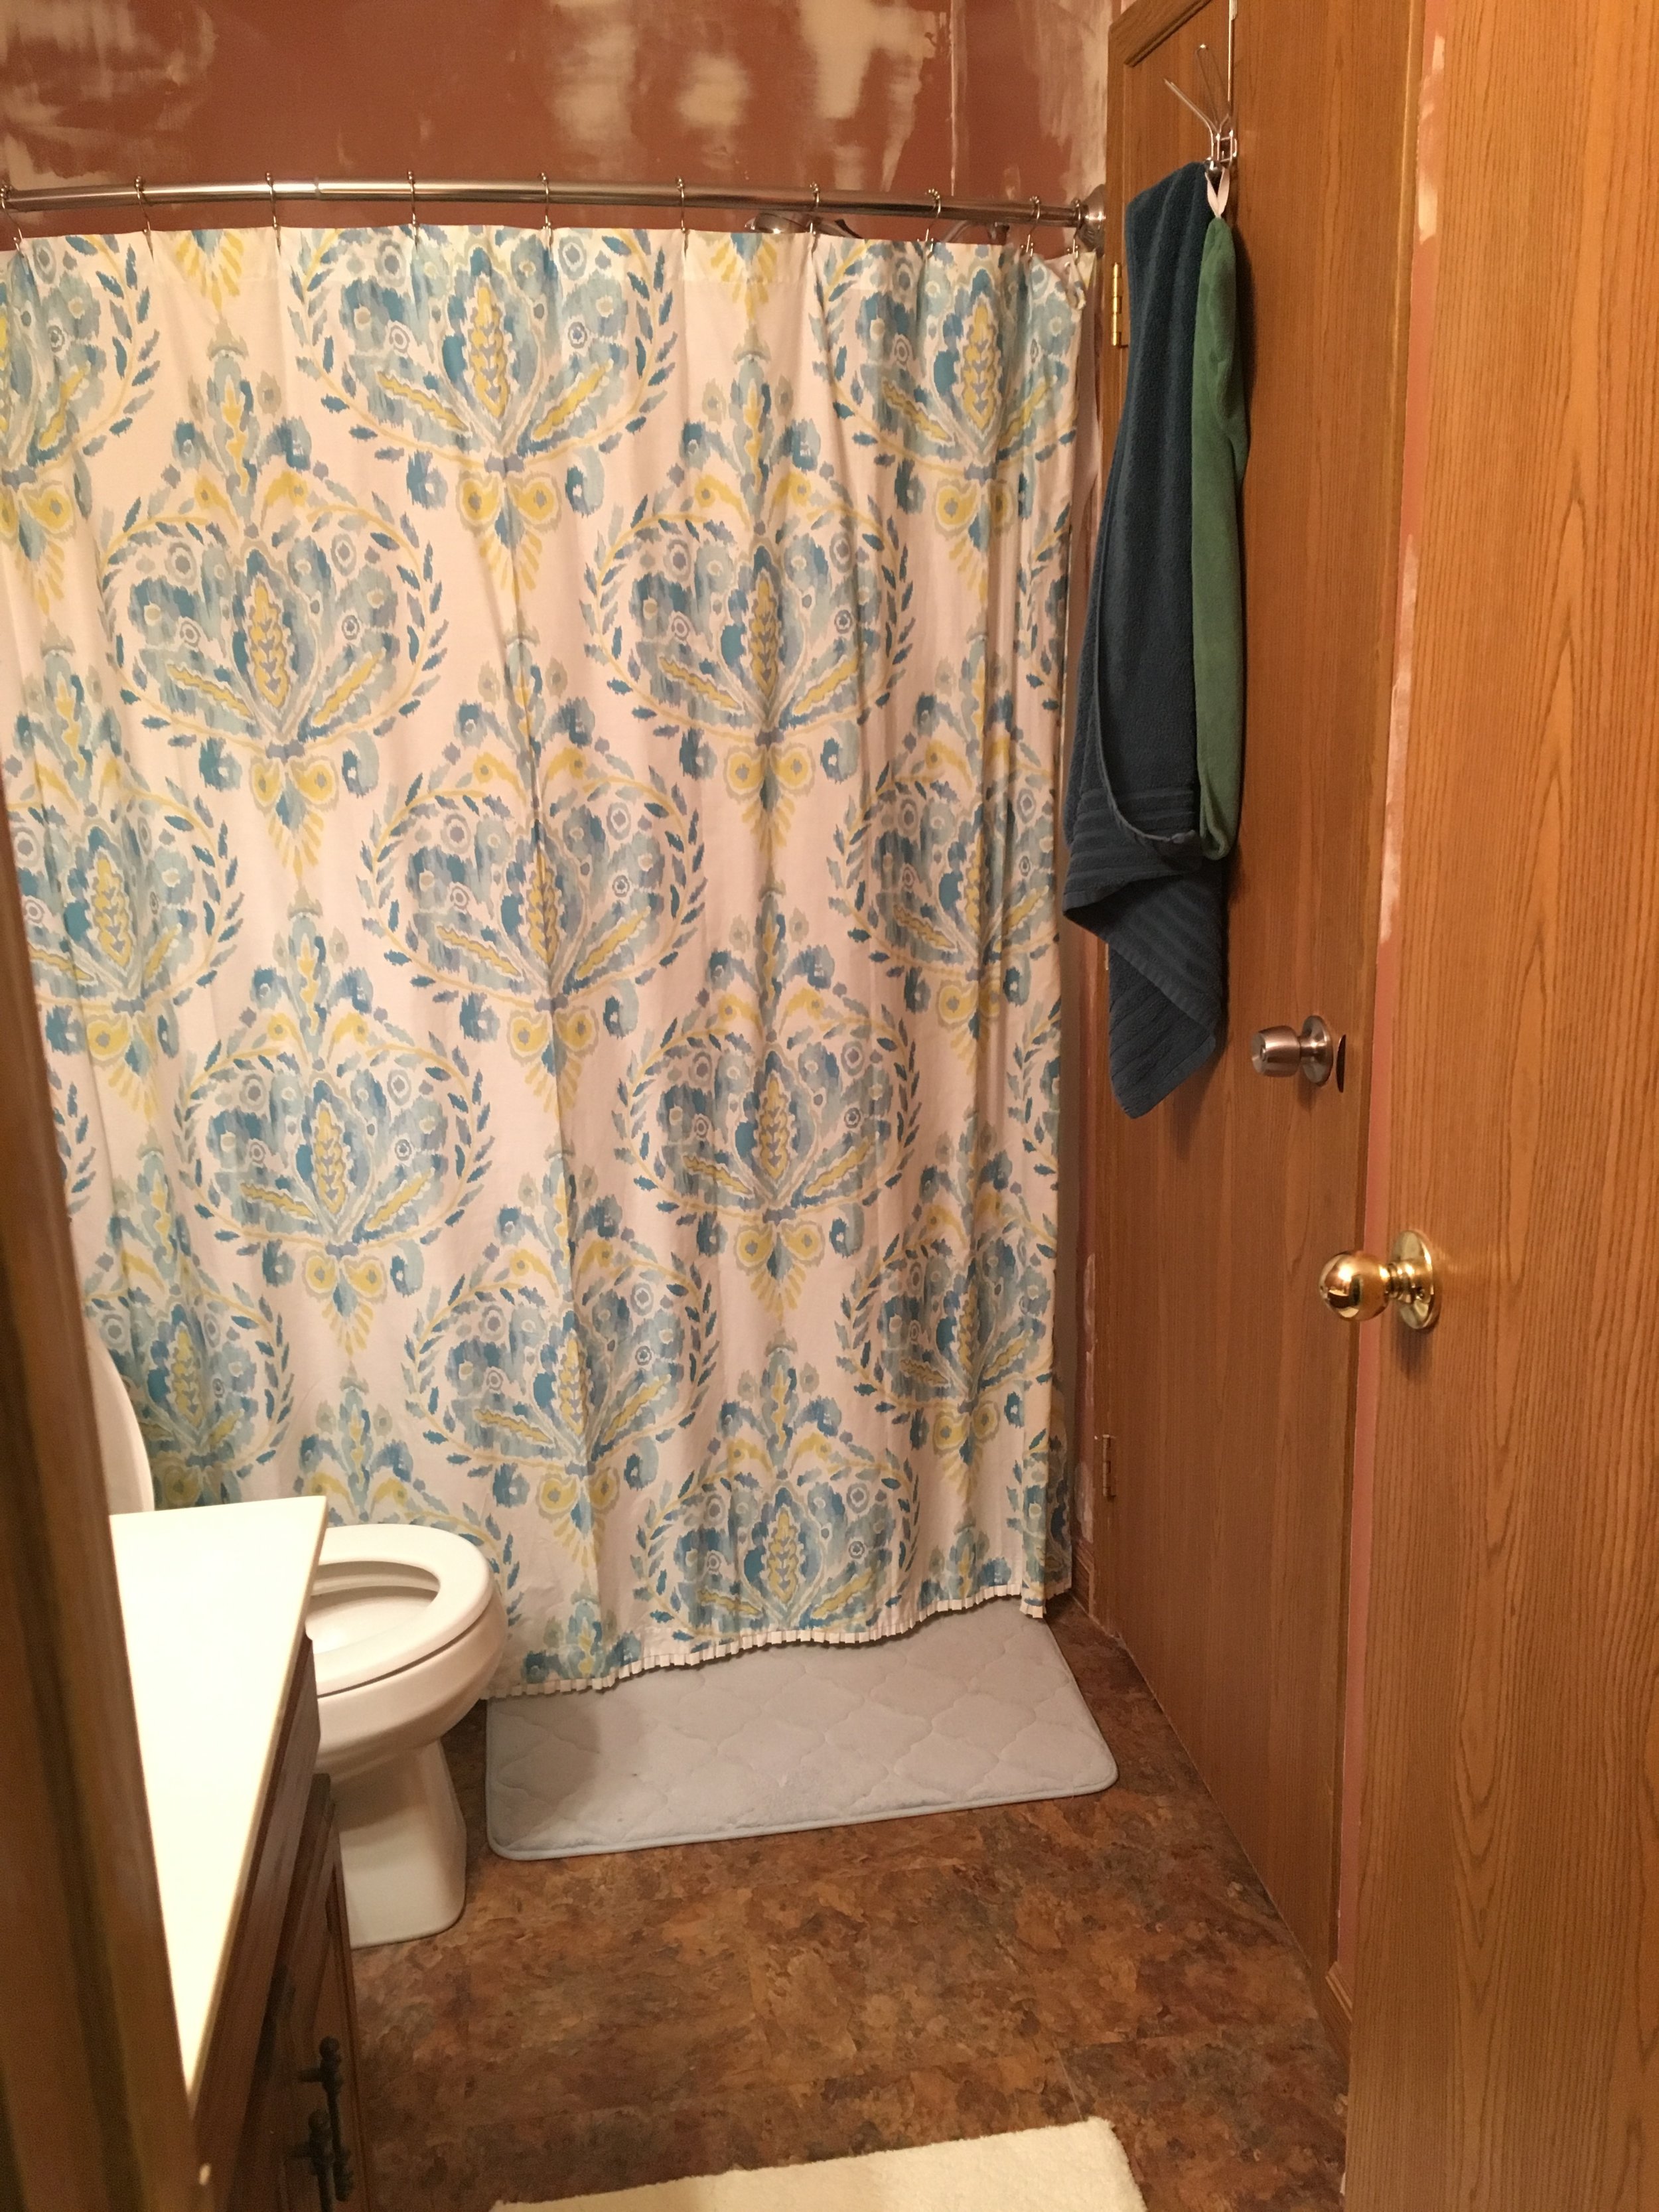
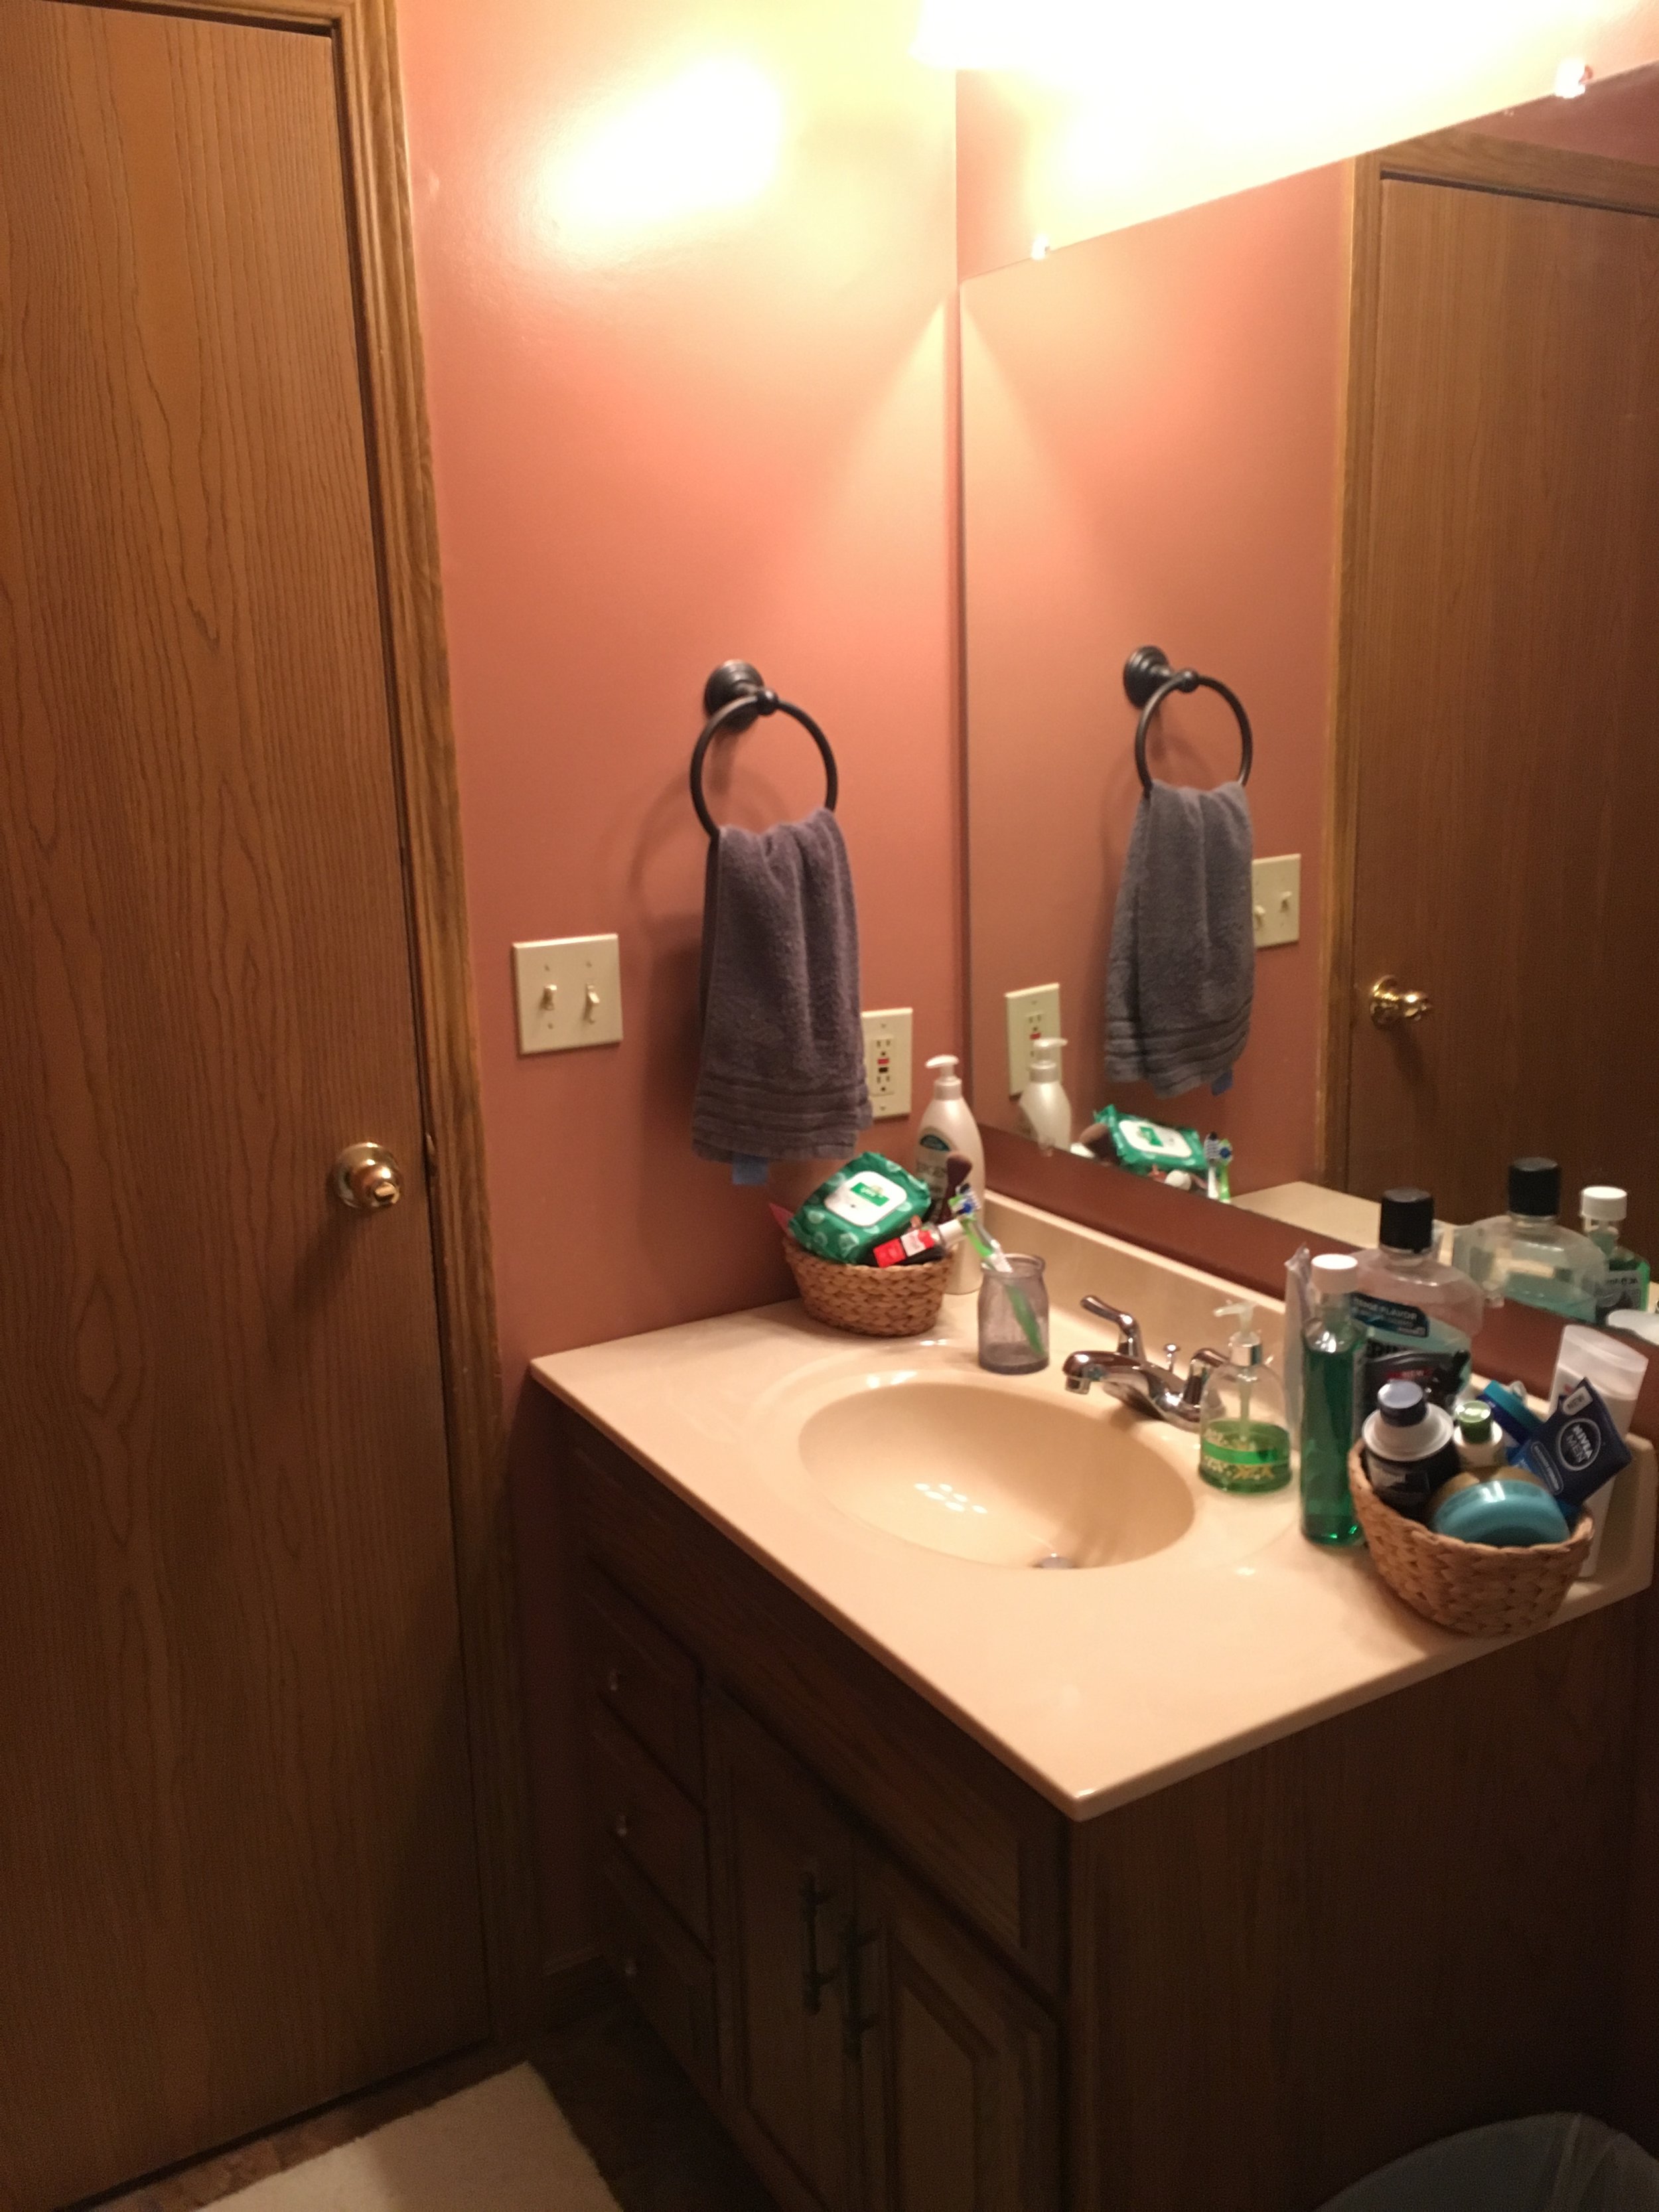
Here's a refresh on what the bathroom looked like before. 

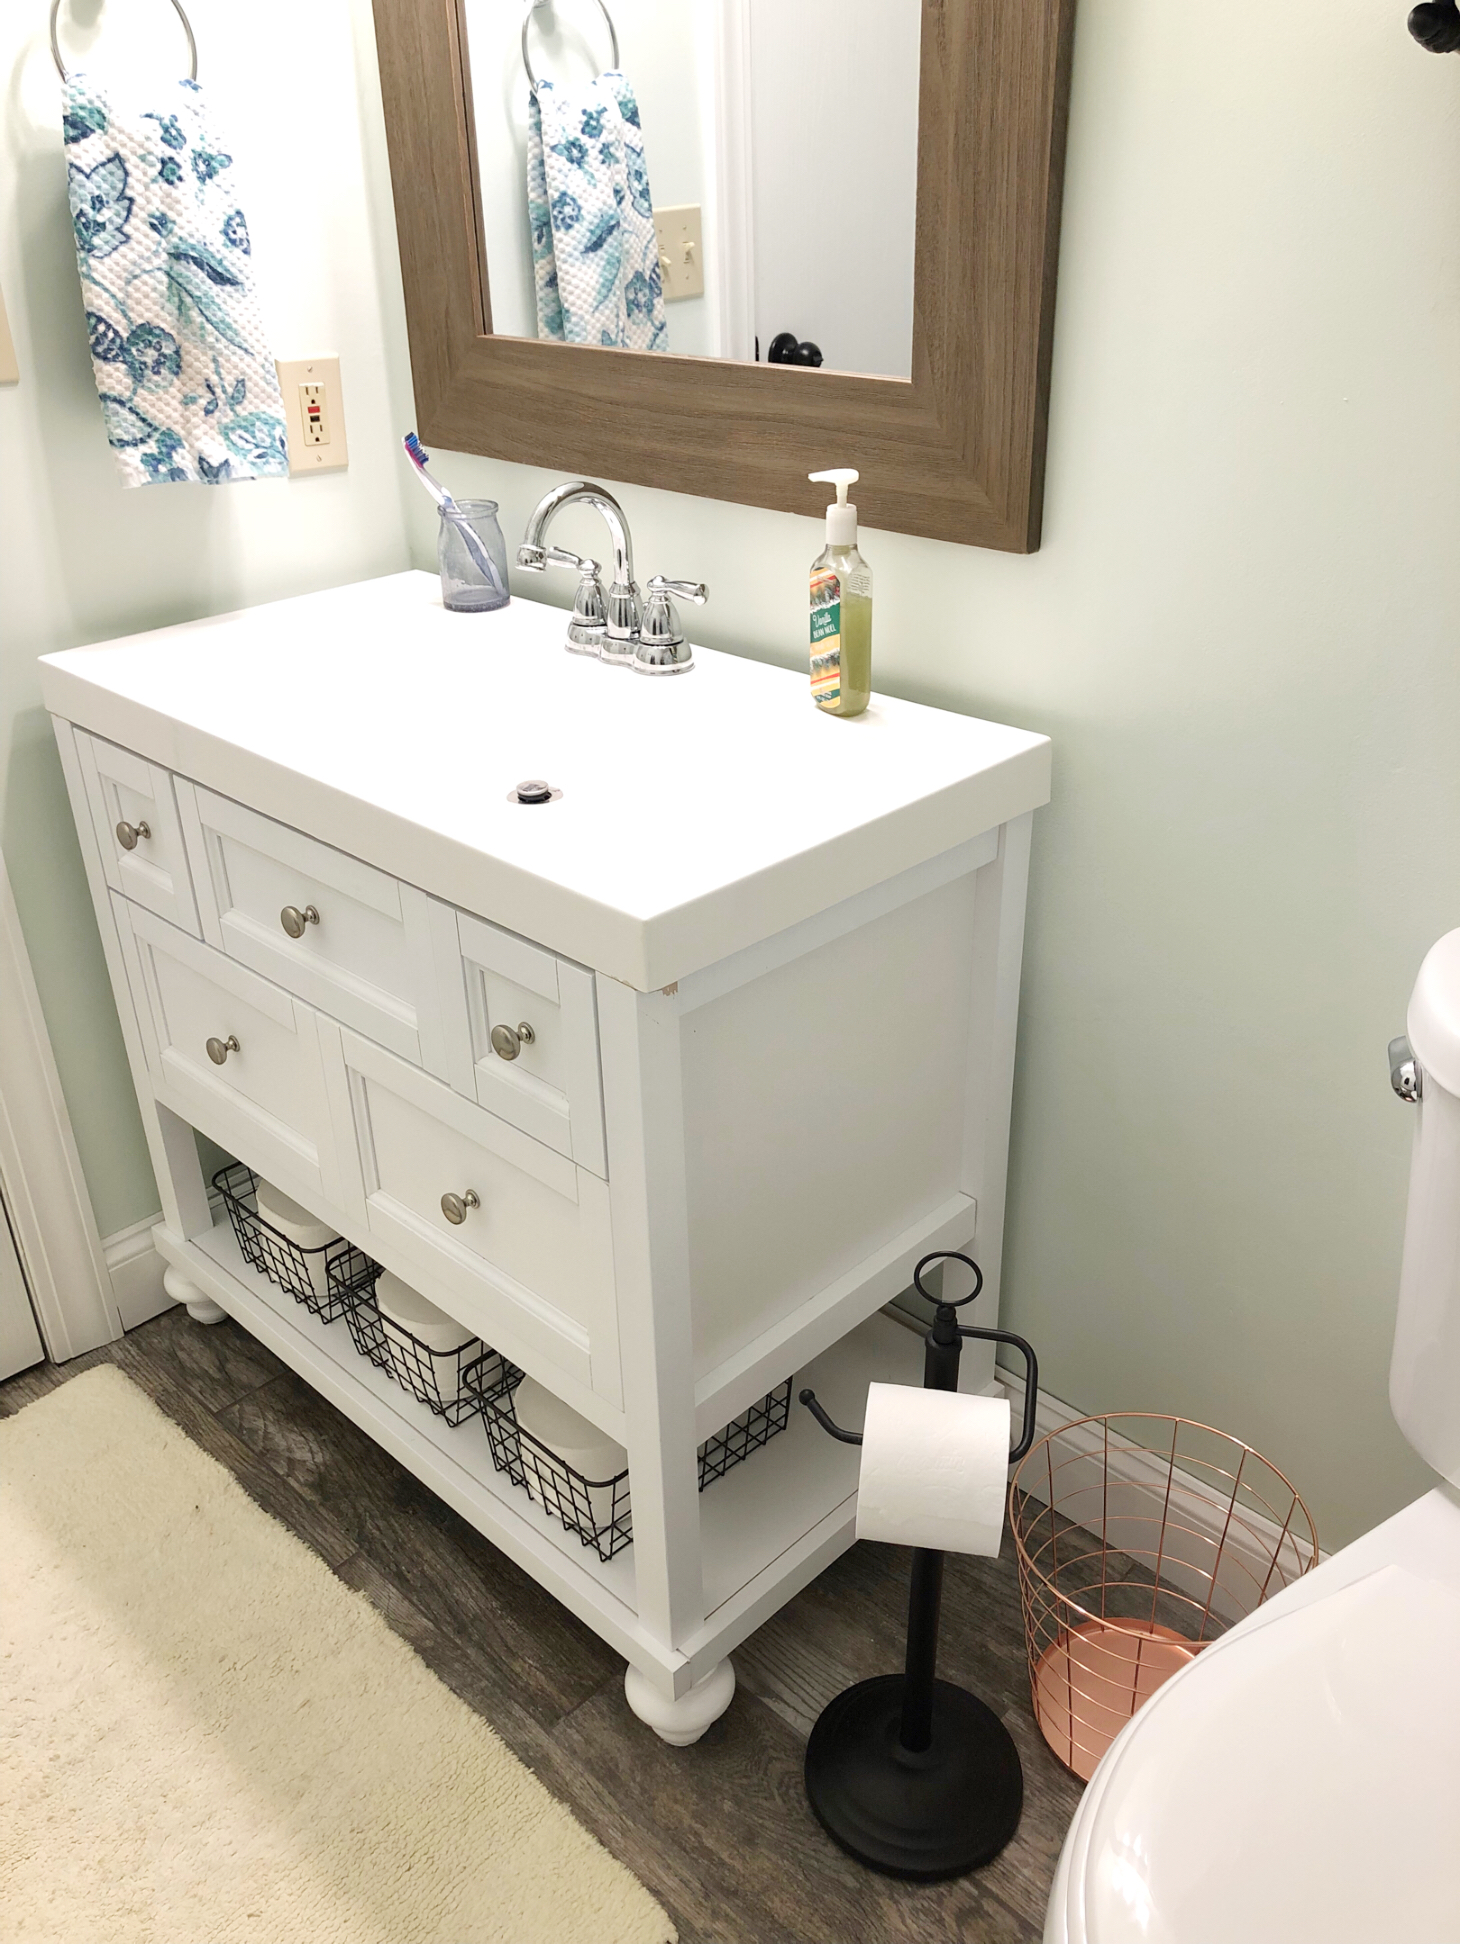
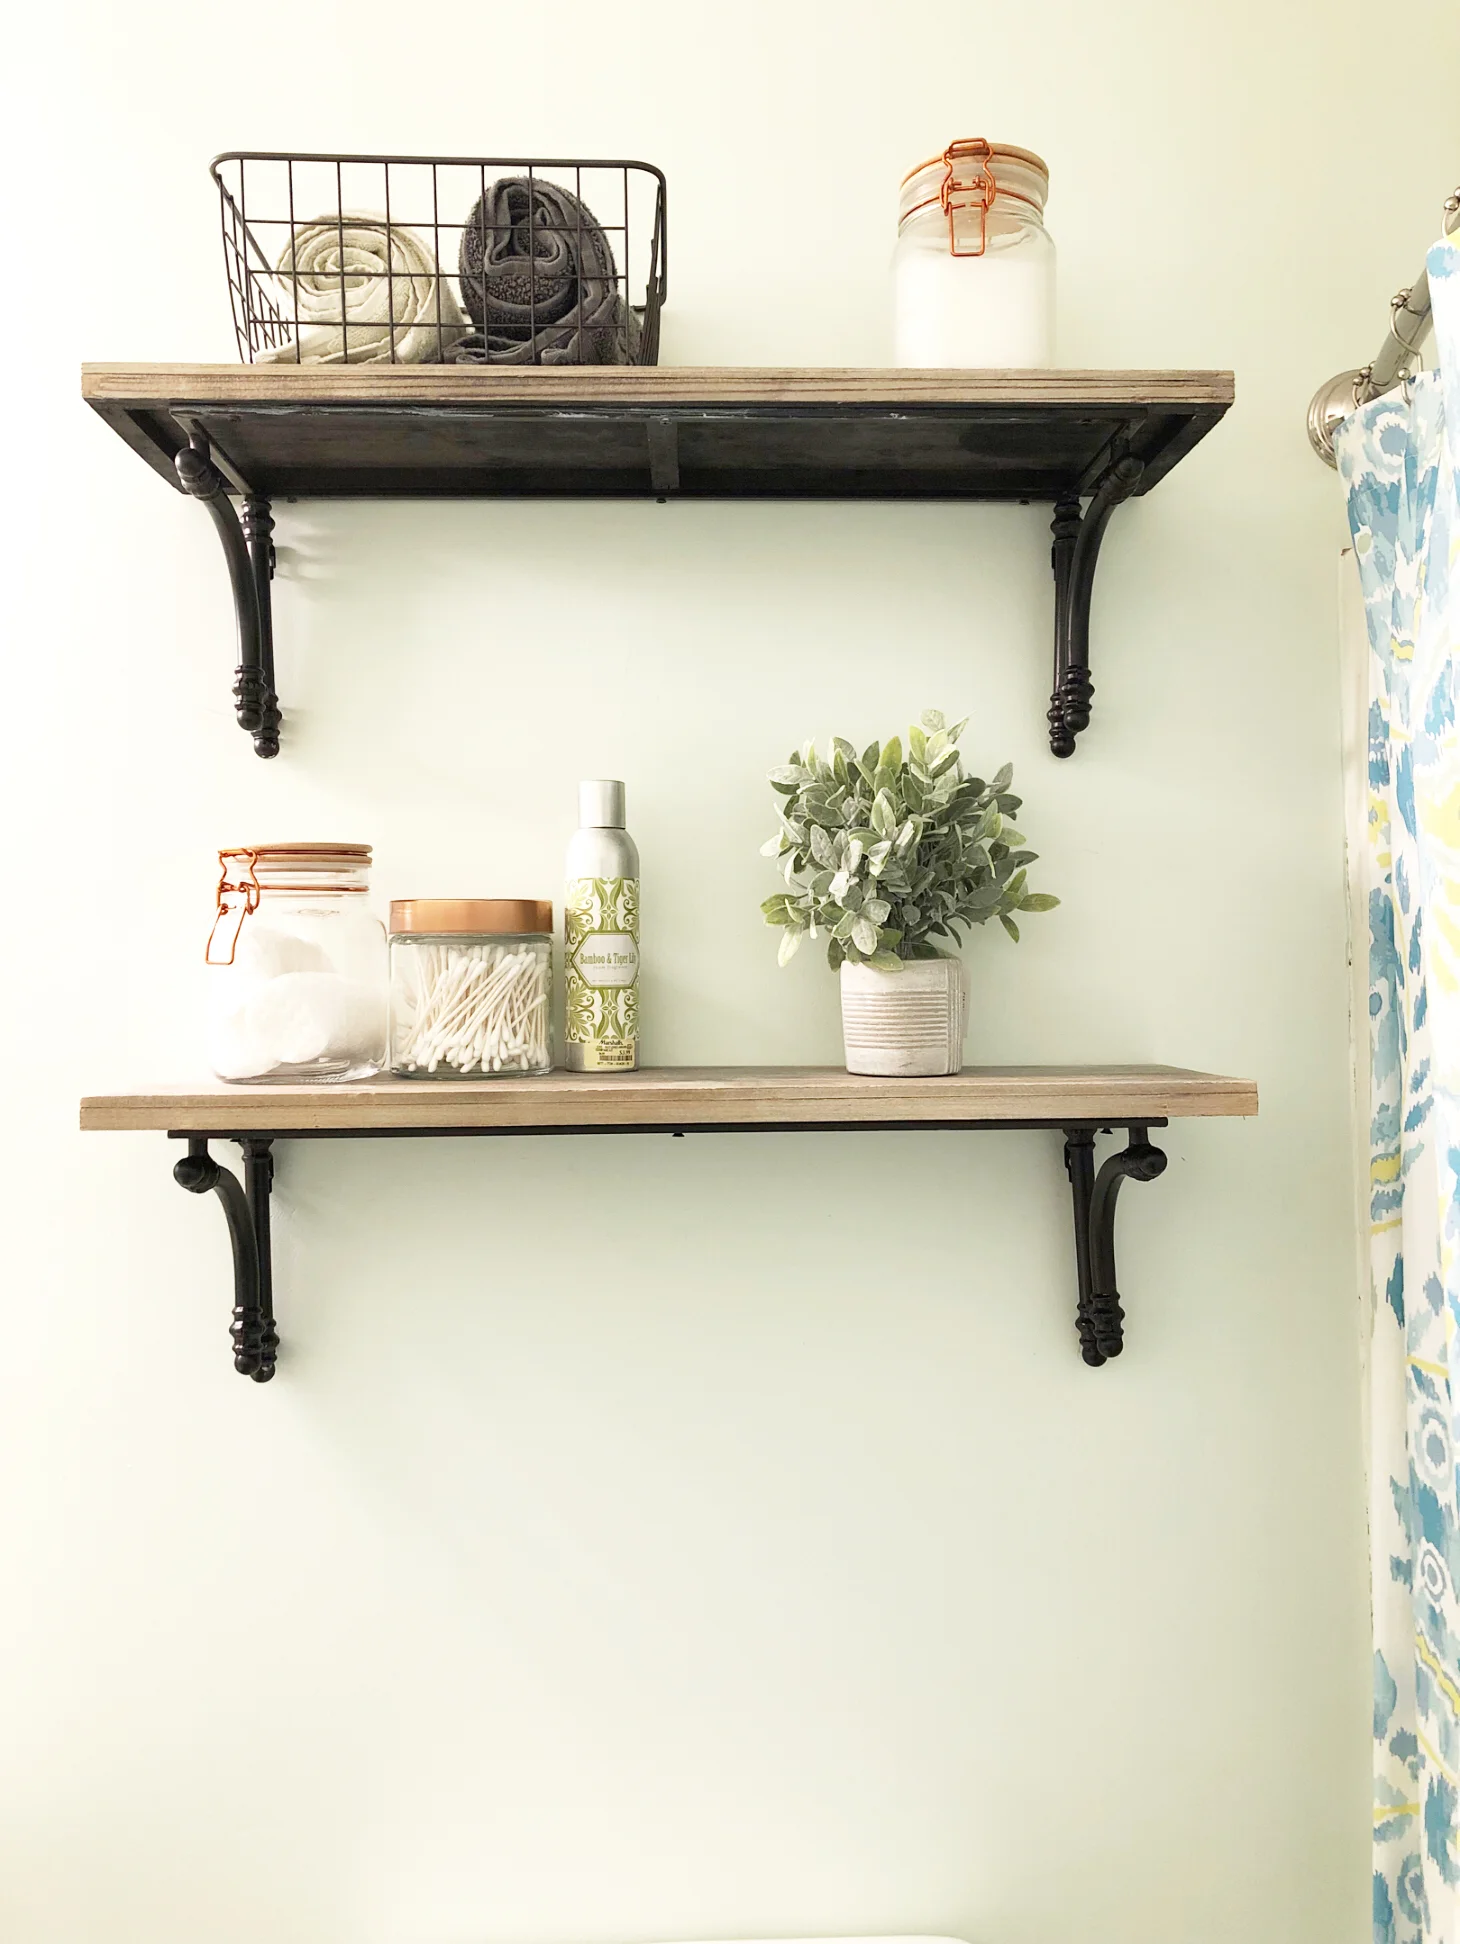
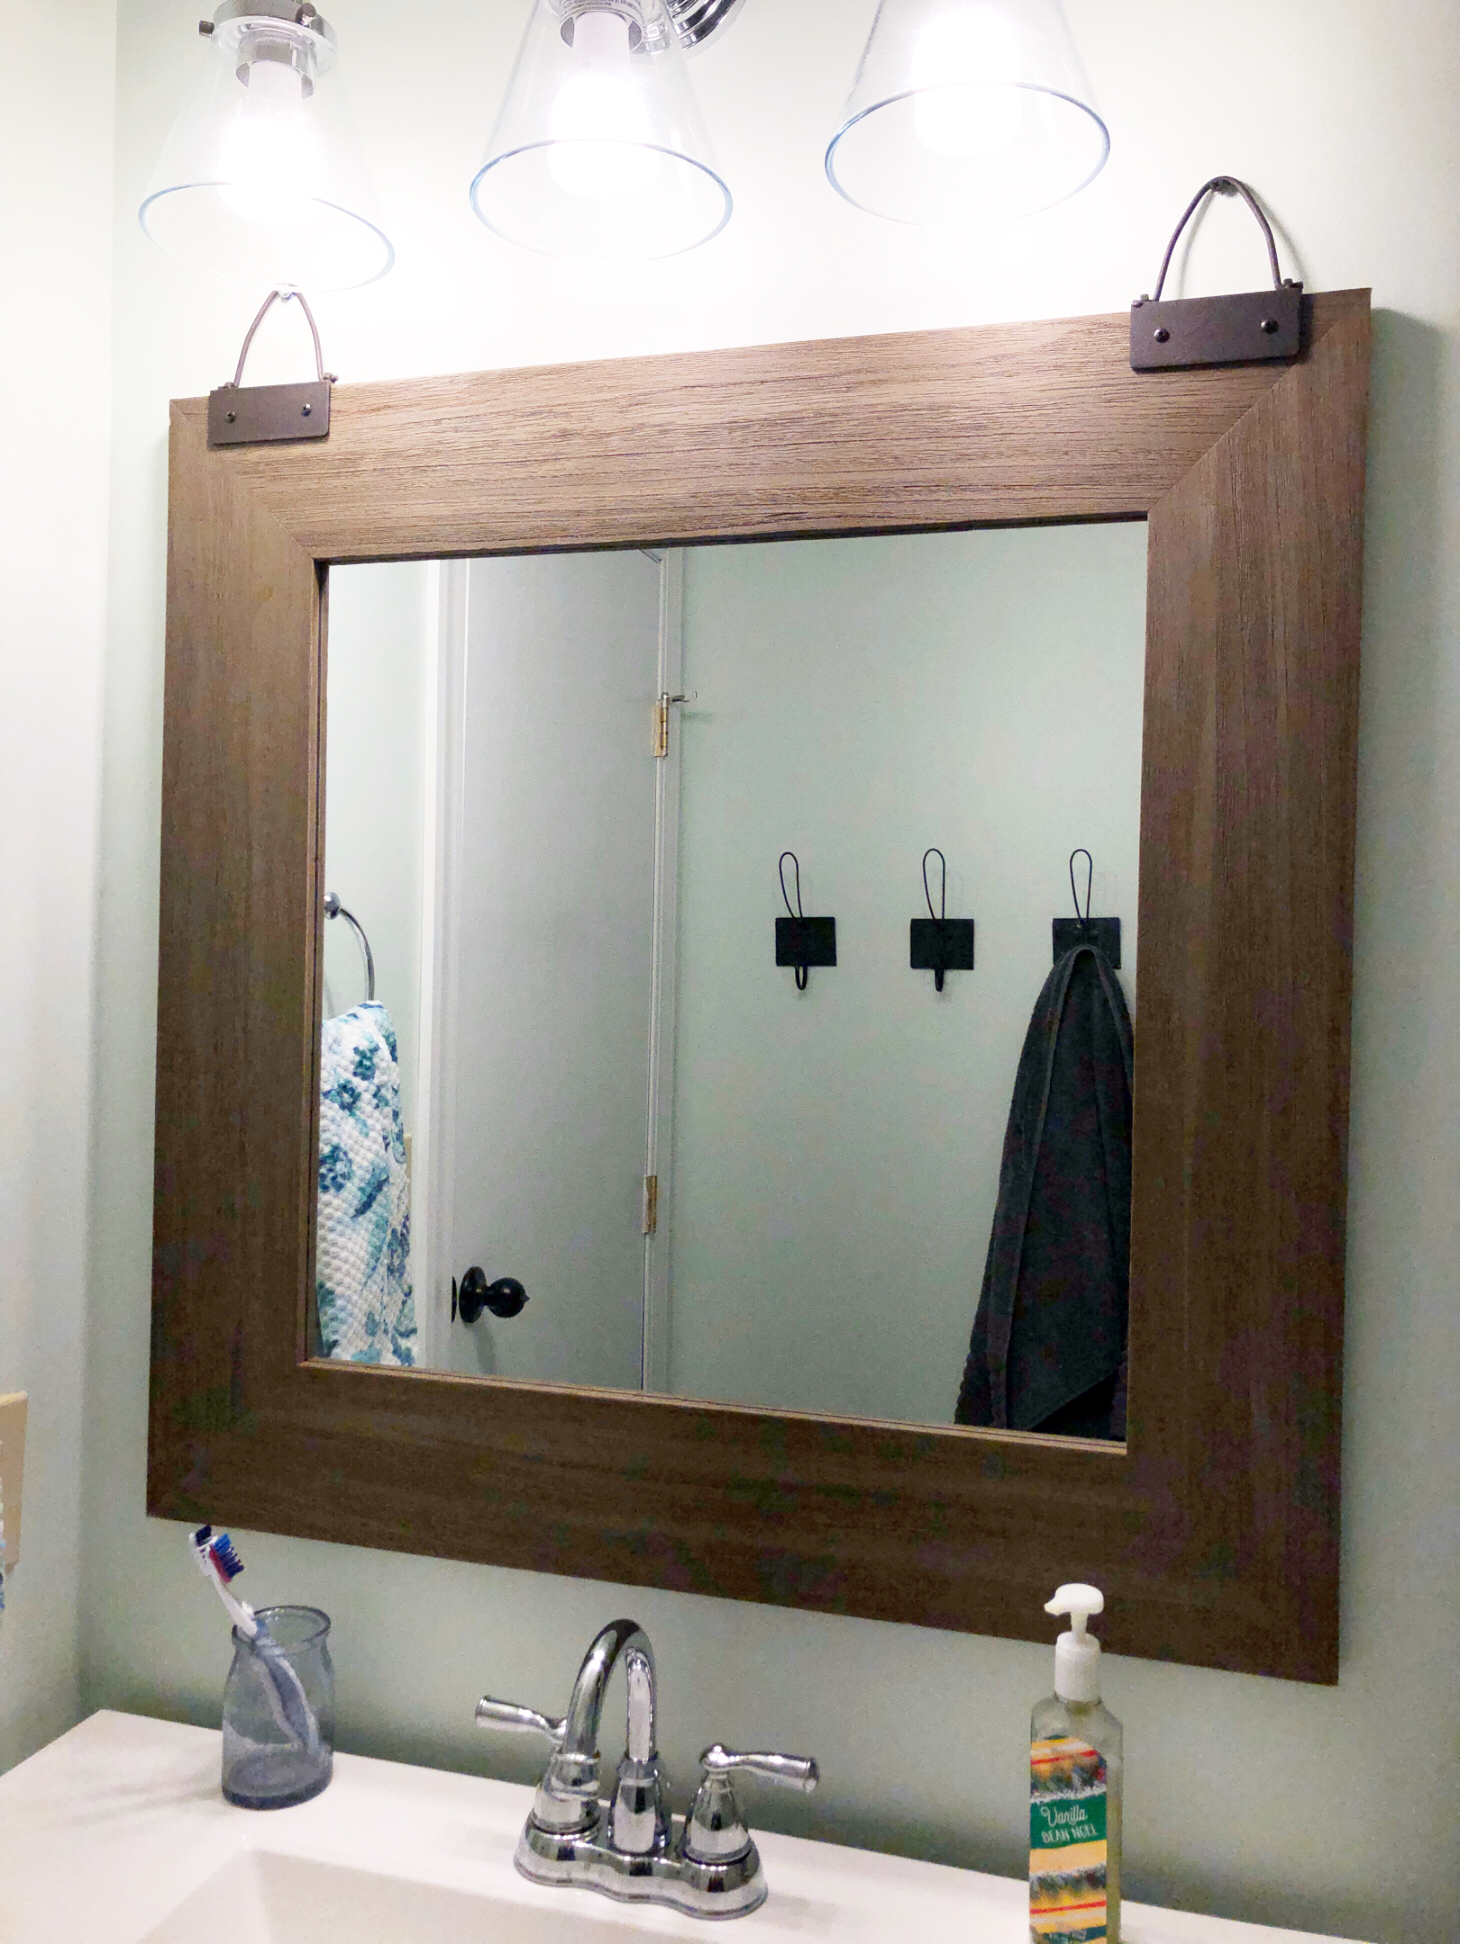
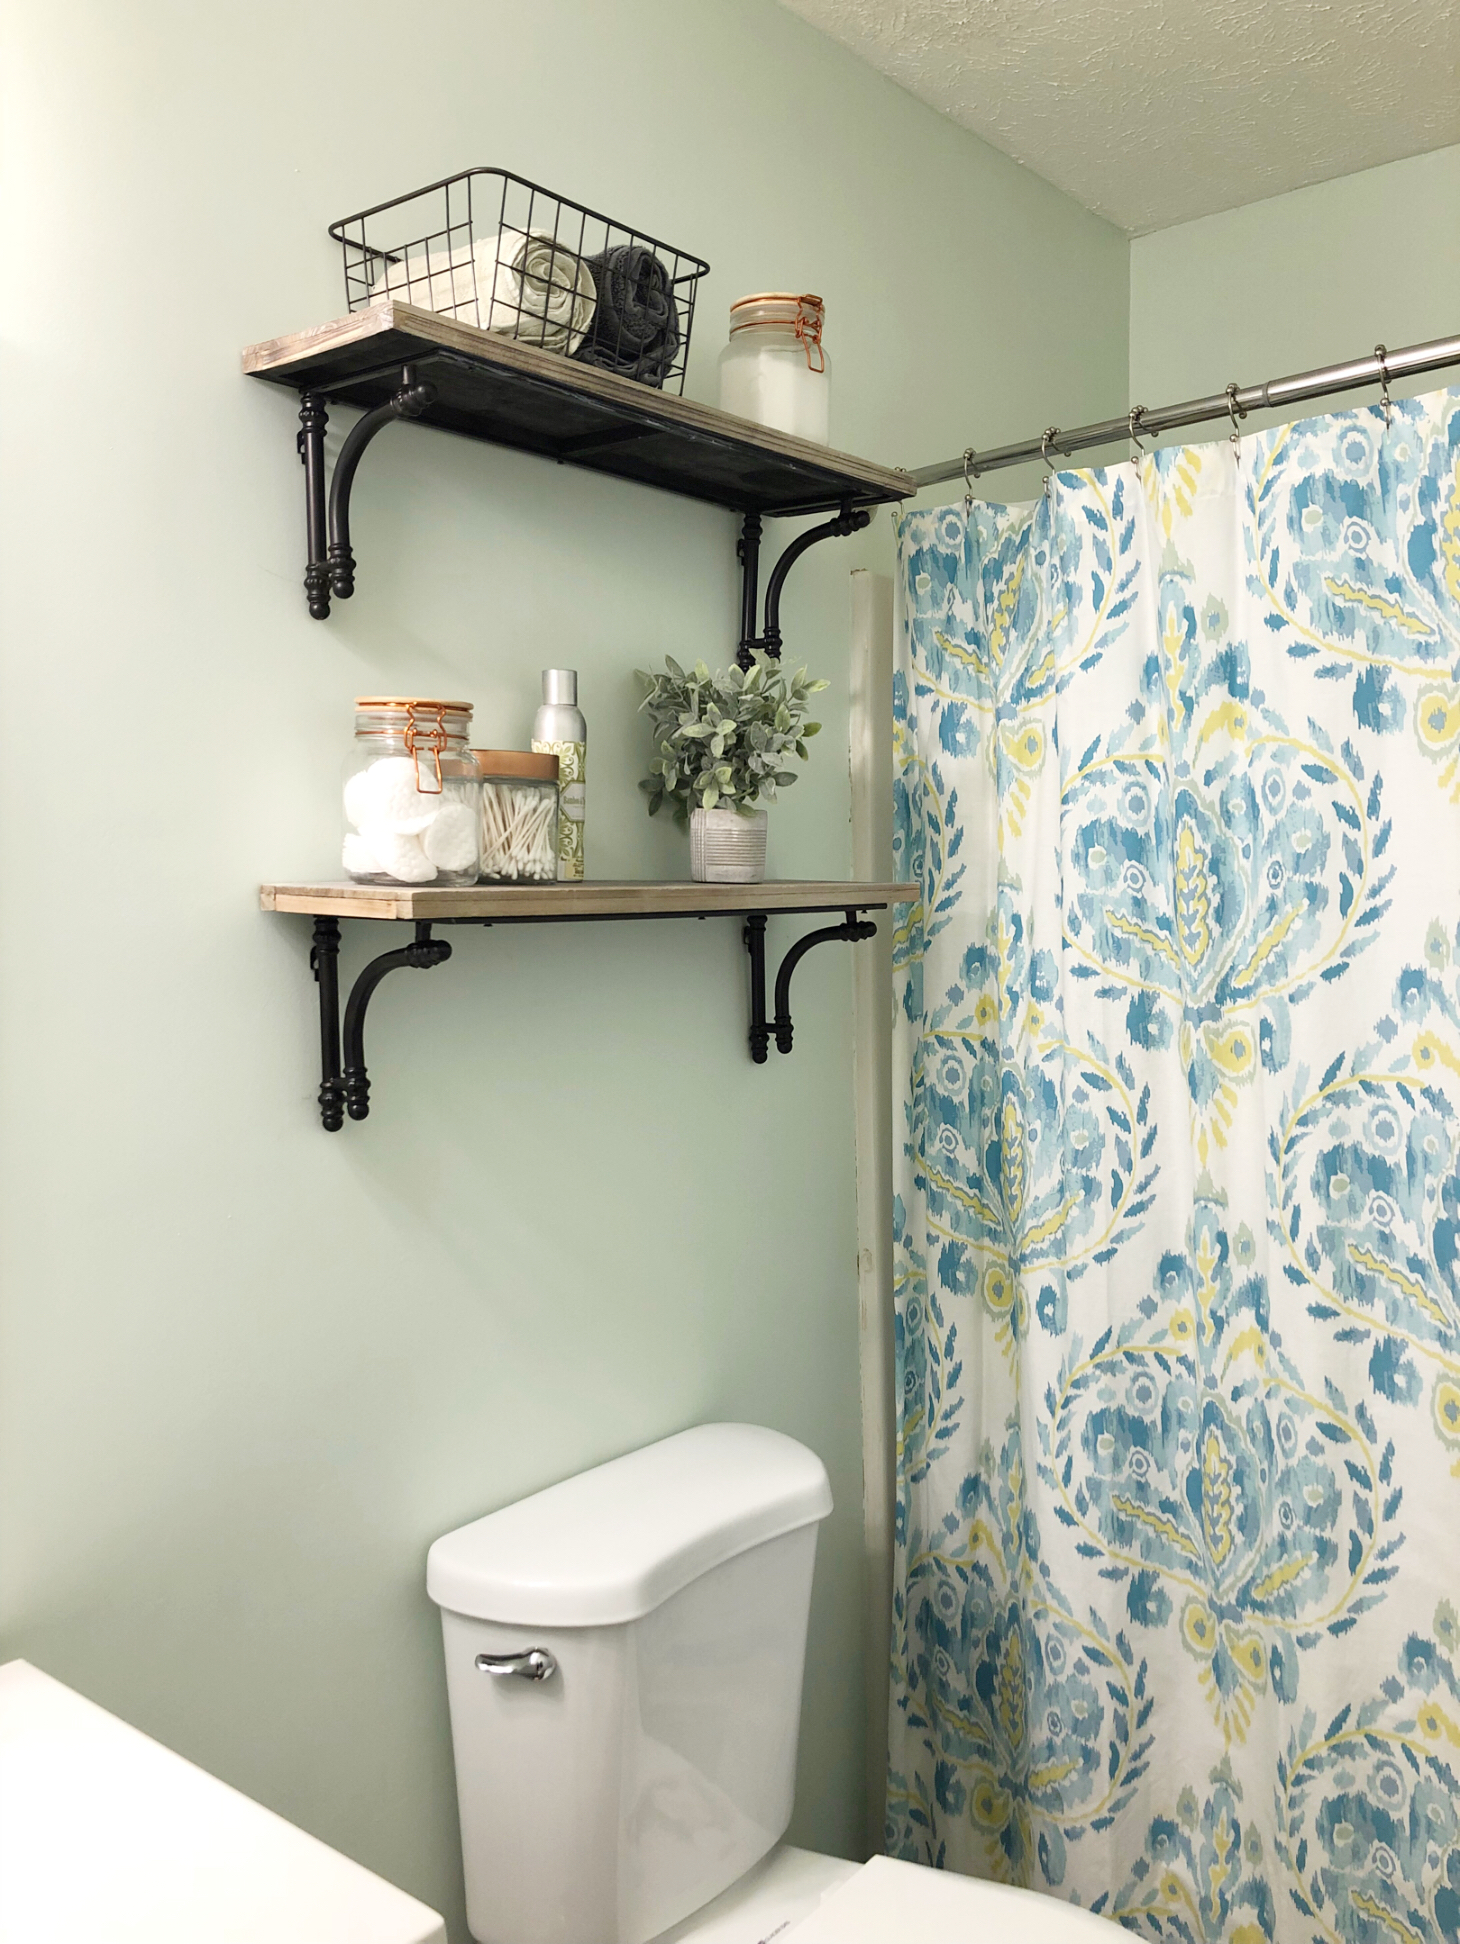
And here is the bathroom now!

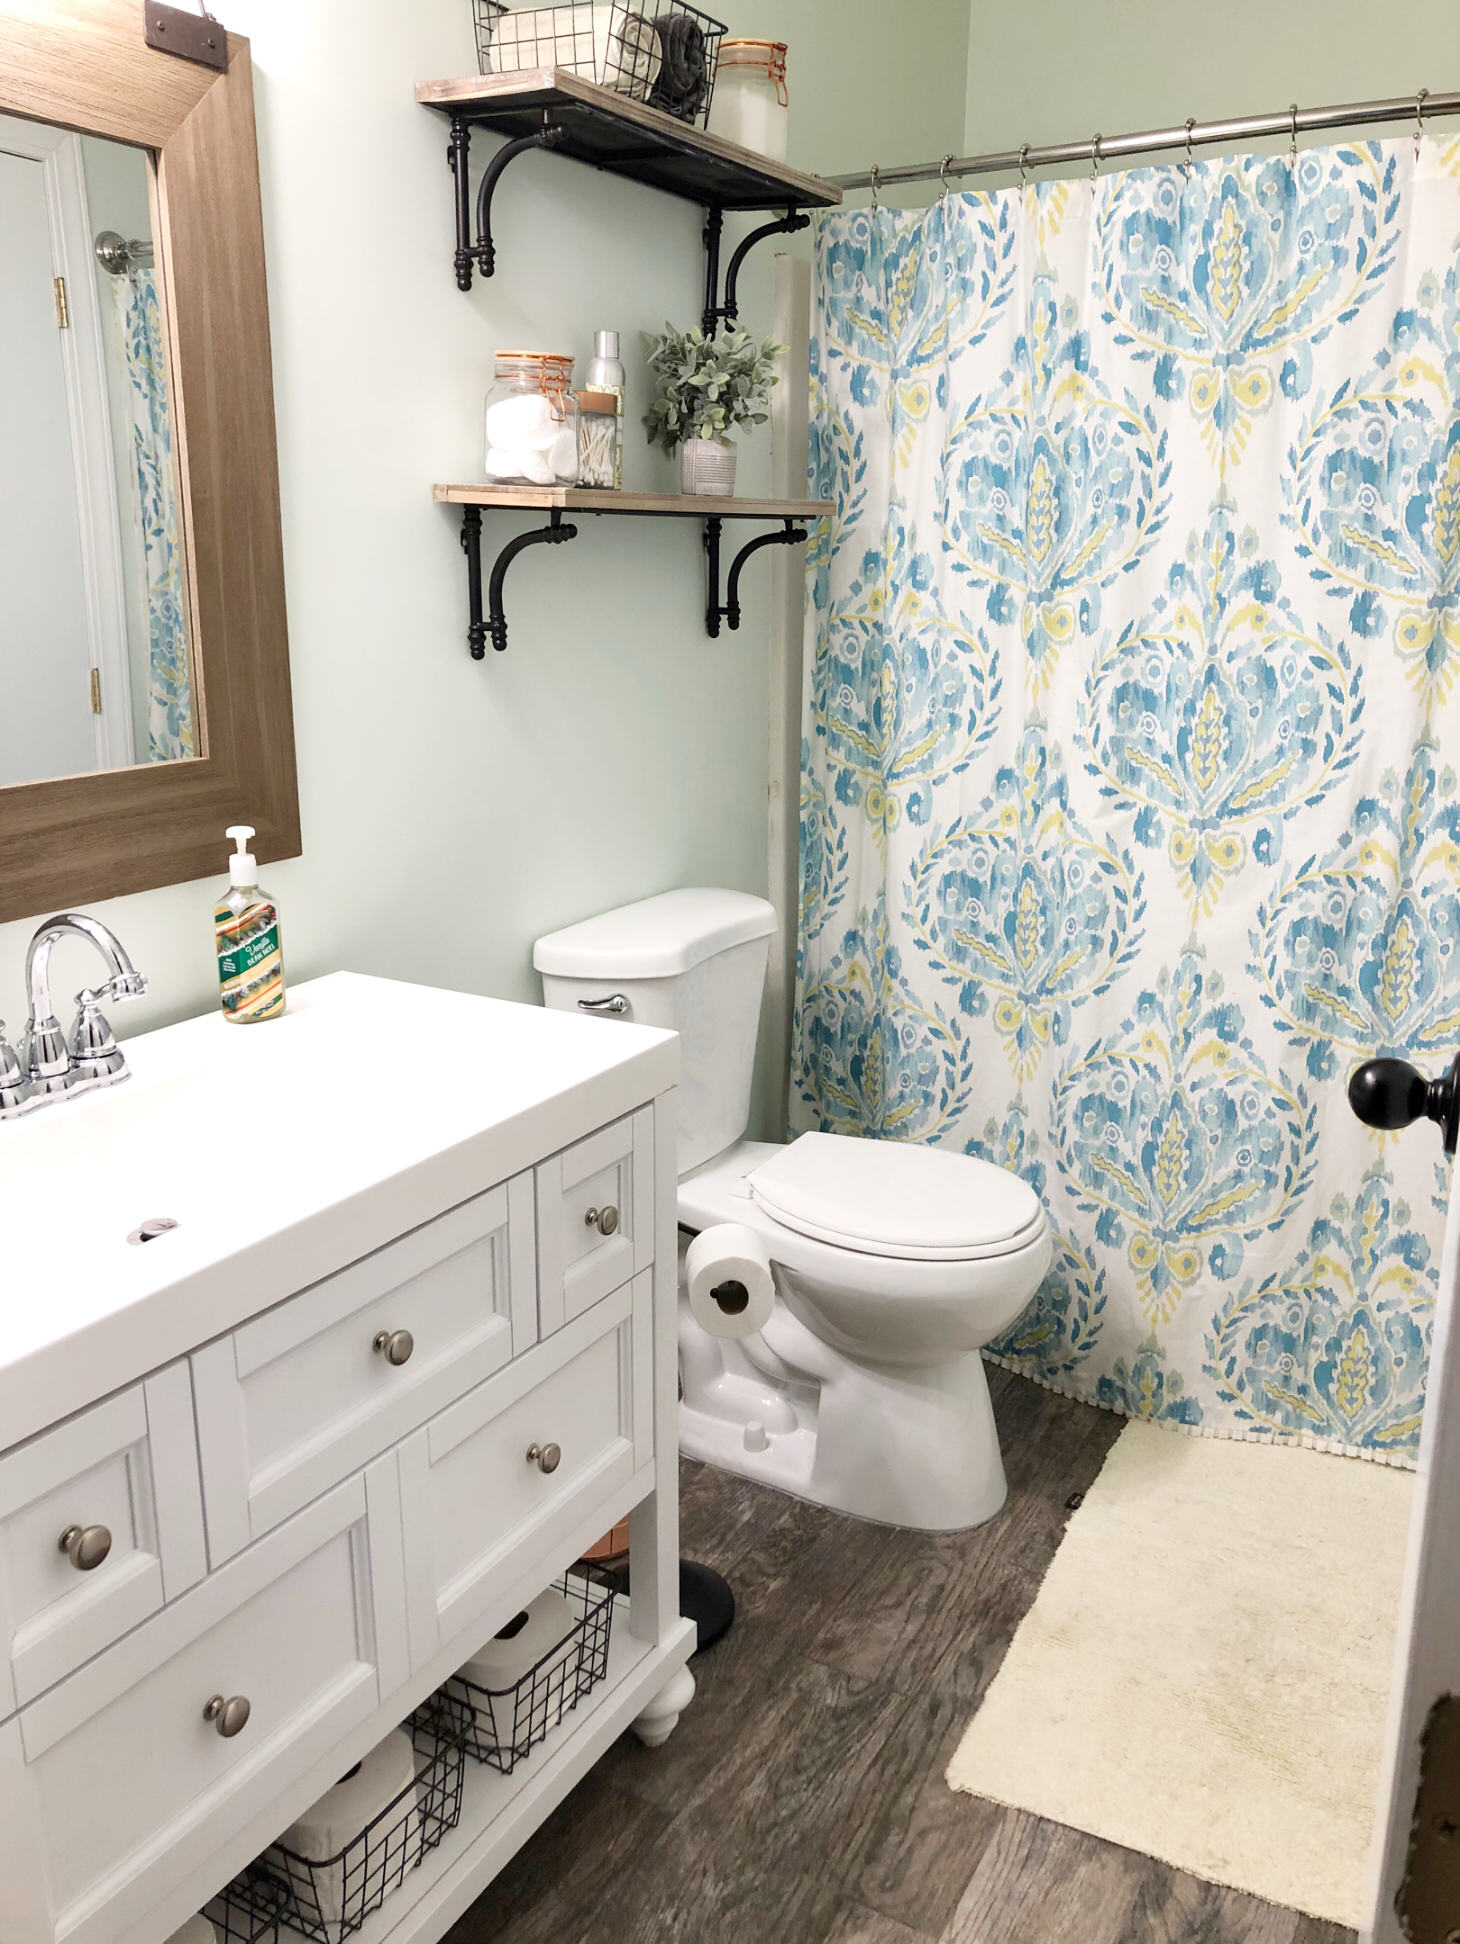
I absolutely love the way it turned out! It is exactly what I had in my mind. 

I really wanted to incorporate some copper, since it's so popular right now, and I thought this was the perfect space to add some touches of it. It's not overwhelmingly copper, but I used some glass canisters with copper accents, and a copper trash can. I also wanted to add in some black accents. As you can see from the rest of my home I love black accents. I used black wire baskets under the vanity and on one of the shelves, which also have some black accents, a black toilet paper holder, and some black hooks. I think the black really pops against the light walls. 

We had to add new vanity feet because the ones that came with it didn't feel very sturdy and it made the vanity too tall. So, we got these vanity legs from Home Depot and painted them white to match the vanity. 

Speaking of the vanity, man this thing caused some problems. As I just mentioned, the vanity legs were not sturdy at all and actually broke a little bit while we were trying to stand it up. It was also really tall. We aren't super tall people and the space isn't very big so the tall vanity seemed out of place in our bathroom. Also, the vanity top doesn't sit completely on the vanity. It pretty much sits on only the corners. We used an adhesive to attached it so it's secure, but I would prefer it to be touching all four sides of the vanity top. Overall I love the way the vanity looks. It was a good price, and I think it shows in the quality of it. But it does work and looks great in the space. 

I am so happy with the way the bathroom turned out! John did such a great job with everything! He is so awesome with executing all of my design dreams and making them look better than I imagined. 

I hope you enjoyed seeing the before and after pictures of this bathroom remodel. Let me know what you think of the end result in the comments!

Thanks for reading! 


Sources:

Vanity

Mirror

Light

Floor

Shelves

Hooks

Toilet paper holder (Similar)

Faucet


A Modern Farmhouse Bathroom - Storyboard

I mentioned before that we are going to be redoing our upstairs bathroom and now it's that time! On Friday we will be quoting Chip Gaines, "It's demo day!" I'm so excited to see the end result! 

This is how our bathroom looks right now. My husband started patching and sanding so that's what the white spots are on the walls. The walls are this pink/red/brown color that makes the room feel smaller than it is. The floor is a vinyl that is made to look like a stone with browns and tans. The vanity is probably the original with a brown vanity base and a light vanity top. 

I can't wait to bring in some lighter colors and update this space to our modern farmhouse style!

Bathroom Before
Bathroom Before
Bathroom Before
Bathroom Before

Just like I do for my clients, I like to make a storyboard before we do a project. It helps me see what the space will look like and I can see the different products next to each other. Here is the storyboard I made for our full bathroom. 

Bathroom Storyboard

We're painting the walls a lighter green/gray color and replacing the outdated floor with some wood look tile in a light brown.

We got a new vanity that's white with a white top. The bottom is open which will help make the room not feel so small. We chose to go with the same faucet we have in our downstairs bathroom. I love the simple classic look of it.

Instead of a towel bar, I want to use hooks to tie in the farmhouse style. I chose black to contrast all the light colors I have in here.

The light fixture is modern farmhouse and simple. I love it.

I have some wood and black shelves I'm going to put behind the toilet for extra storage. I got some glass and copper canisters from the Target dollar spot I'm going to use along with some copper wire baskets for even more storage.

For the rugs, I want to stay light and bright with some simple white bath mats.

I really wanted to tie in some rustic charm with the mirror. I'm not sure if we're going with this exact mirror, but we want the same look. 

We're keeping our shower curtain because I love it so much! The colors tie in so nicely with the new design. I picked the wall color with this shower curtain in mind. 

My overall feel for this bathroom is modern farmhouse, which is basically our entire house. I love the mix of farmhouse style with some modern elements. 

I hope you enjoyed seeing my vision for our bathroom. I will share the after photos when it's done! 

Thanks for reading! 

If you enjoyed this post you should check out Bathroom StoryboardFarmhouse Floor Tile, What is E-Design, and Why E-Design 

A Farmhouse Master Bedroom

We are in the process of redoing our master bedroom and just need to paint the doors and door knobs and add new trim. We have already painted the walls and I wanted to share with you my storyboard I put together! 


This is my vision for our room. We have the bedding, pictured top left, and our bed. We also have the black sign and the window frame. Our wall color is Sherwin Williams Sea Salt and I love it! It's a light relaxing blue/green/grey. I want to do drop cloth curtains with black rods and add light lamp shades to go with our existing lamp bases. On my dresser I want to add some vintage pieces like old glass bottles and old books. I want the feel of the room to be relaxing and comfortable. 

I am so excited to finish up this space! It already looks a lot different with the lighter walls compared to the green that was there before. The white doors and baseboards will help make the room feel even brighter. With only two windows, we need all the help we can get with brightness. That's why I chose a lighter bedspread and lighter paint color. 

I love adding some natural feeling pieces as well, like the metal wall vase and the florals. I think it makes the room feel airy and relaxing. 

I can't wait to share the after photos!

Thanks for reading! 

Storyboard Reveal

I am so excited to share with you the final look of this beautiful room I worked on a few months ago. This is my sister's bedroom and I am in love. My sister and brother-in-law moved into my grandparents' house about a year and a half ago. The house was built in the 1920's so it is old and gorgeous! Hardwood floors and thick baseboards are just a few beautiful details in this home. I was so happy to get to help them design their master retreat.  


I chose this cozy grey upholstered bed for them because it brought in some really nice texture and was a nice lighter color. The studs on the headboard add an extra design detail as well. They already had this comforter so I worked the design around it. I fell in love with these pillows as soon as I saw them and they worked perfectly bringing in lighter colors to a darker comforter. The walls were already painted this lighter grey, which I am obsessed with. The nightstands add a bit of a modern touch, which is my brother-in-law's style. Their room is pretty large so I thought it would be fun to add a little reading nook with a chair or two. The grey is the perfect color and the details work well with the headboard. I love this piece of art for above the bed. It ties in the colors from the pillows perfectly. The rug works well to bring in more texture and the color is perfect. 

Here is the room all finished. I love it!

As you can see there are a few modifications that they made, which is why a storyboard is such a great way to redesign. I gave them ideas and they executed them in their own time and were able to change things if they wanted. In this case they decided to have a dresser here instead of a vanity. It works well in the space and fits their needs. 

Above the bed, they decided to paint their own artwork and it turned out great! What a fun DIY! They used the original painting from the storyboard for inspiration, bringing in the same colors and using the same lines. That is another advantage of a storyboard, you can take the items I select and DIY a few if you choose! 

I had so much fun helping them design their master retreat. The colors and the character were so much fun to play with. 

If you would like a storyboard of your own, check out my e-design page. This is a great way to redesign a room and be able to execute it in your own time. Whether you want a whole new room design, or just need some help adding those little details, there is a storyboard option for you. I would love to help you turn your house into a home. 

Thanks for reading!

What is a Storyboard?

E-design is a relatively new service offered in the interior design industry. It's not something a lot of people are familiar with. In a previous post I explained what e-design was, how it worked, and why it's a beneficial service. Now I want to talk about the most important part of e-design, the storyboard. 

Most people probably have no idea what a storyboard is. A storyboard, or sometimes also referred to as a design board of a vision board, is what I create custom for each client. The storyboard will have the complete design vision for your room. On the storyboard may be furniture, window treatments, rugs, and accessories depending on which storyboard option you choose. The options include Room Refresh (furniture, window treatments and accessories), Complete Redesign (everything included in Room Refresh plus wall colors), and A La Carte (accessories or color palette). 

This first storyboard is an example of a Room Refresh option. For this office I have picked out furniture, curtains, a rug, and accessories. 


This next storyboard is an example of the Complete Redesign option. On this board you see furniture, a rug, curtains, wall color, and accessories.


The storyboard is to help you visualize what your room will look like. It's hard sometimes to see a rug and curtains separately and try to visualize what they will look like in the same room. Having all the pieces together on the board makes it easier to see how the room will look and how all the items will tie together. 

Each storyboard is created with the client in mind. I think about their own personal style and preferences, how the room will be used, and different needs they have for the room. If you need a family room to be kid friendly I won't pick out a bright white couch that is basically asking for stains. Instead I may choose a dark grey sectional and furniture with extra storage for toys. Each storyboard is designed with you in mind. 

I hope this helped you better understand what a storyboard is. If you have any questions about storyboards or e-design in general please feel free to comment below or ask me on the "contact me" page of my website. 

Thanks for reading!